Has your morning brew developed a sour aftertaste or a sluggish flow, indicating it is high time to clean coffee maker components before the calcification becomes permanent? We identify the accumulation of stubborn limescale and rancid oils that sabotage your coffee’s delicate notes, offering a systematic guide to restoring your equipment’s original efficiency without relying on harsh industrial chemicals. You will master the precise maintenance rhythm and a proven household technique that significantly outperforms expensive solvents, ensuring every future cup delivers the pure, unadulterated flavor you expect.
Why Your Coffee Tastes Off and How Often to Fix It
You buy premium beans, yet your morning cup tastes like mud. The problem isn’t the roast; it is actually your neglected machine. We wrongly blame the coffee when the equipment fails us.
This flavor degradation stems from silent internal accumulation. Residue builds up inside the system over time, sabotaging every single brew.
The Hidden Culprits Ruining Your Morning Brew
Two enemies hide inside. Mineral deposits from water clog the internal pipes. Old, rancid coffee oils cling to the pot and filter basket. These create that distinctively bitter or sour flavor profile you hate.
It gets worse than just bad flavor. That warm, damp reservoir acts as a perfect breeding ground for invisible germs. In fact, it remains one of the germiest spots in the kitchen.
According to a 2011 report, this buildup hurts more than flavor. It drastically reduces your machine’s overall efficiency.
Telltale Signs Your Coffee Maker Is Crying for Help
Your machine screams for attention if you listen. You just need to recognize the specific distress signals.
Ignore these red flags, and you risk total breakdown. If you notice any of the following symptoms, it is time to clean coffee maker components thoroughly.
- Your brew has a lingering bitter or “off” taste.
- The brewing cycle takes noticeably longer than it used to.
- The unit emits loud gurgling or hissing sounds during operation.
- You spot white chalky residue or flaky brown bits in your pot.
- The specific ‘‘clean’ or ‘descale’ indicator light turns on.
Establishing a Cleaning Rhythm: Your Frequency Guide
Effective maintenance requires a two-pronged approach. You need simple daily habits alongside a periodic deep clean. Neglecting either one leads to disaster.
For the deep clean (descaling), consistency is key. We recommend doing this at least once a month for daily drinkers. Casual users can wait three months. Hard water areas demand more frequent attention.
Don’t forget the daily grind. Rinse the carafe, filter basket, and lid with hot water after every use to stop oil buildup immediately.
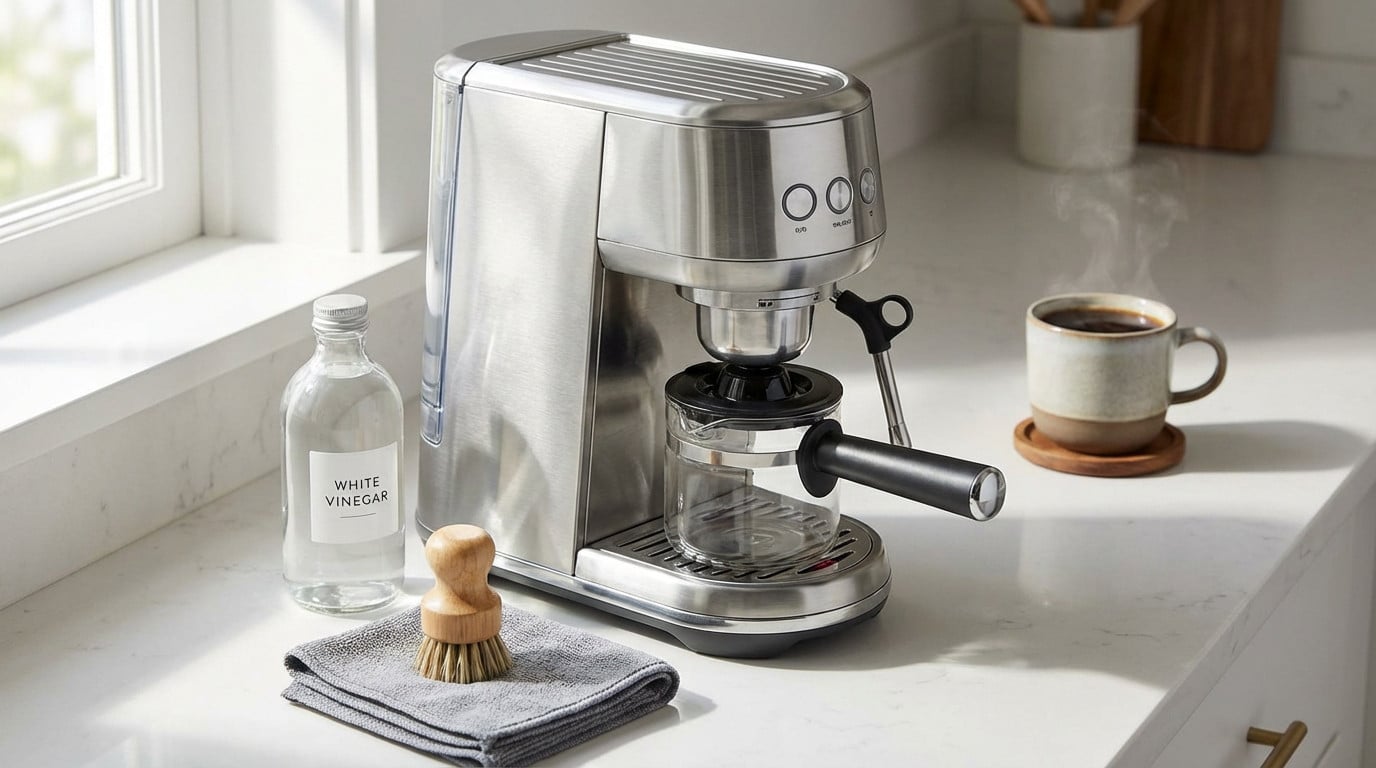
The Classic Deep Clean: Your Step-by-Step Vinegar Guide
Prepping Your Machine for the Operation
You wouldn’t shower in a dirty bathroom, right? A proper clean coffee maker starts with a totally blank slate because you simply cannot sanitize a machine that is still holding onto yesterday’s brew.
First, empty any cold, leftover coffee from the carafe. Then, open the basket and toss those soggy grounds and the old paper filter straight into the trash or compost bin.
While there are plenty of other uses for coffee filters, remove this one. Also, pull out any permanent or charcoal water filter, as vinegar will damage it.
The Vinegar Solution: Mixing, Running, and Waiting
White distilled vinegar is the hero here. Its acidity cuts through mineral deposits that water alone just can’t touch, restoring your machine’s efficiency.
The go-to recipe is simple: mix a solution of equal parts white vinegar and water. Pour this mixture directly into the water reservoir until it reaches the max line.
Here is the trick most people miss. Start the brew cycle, but stop the machine halfway. Let that hot vinegar sit inside for 30 minutes to dissolve stubborn calcification.
The Final Flush: Getting Rid of the Vinegar
After the soak, turn the machine back on to finish the cycle. Once finished, dump that murky vinegar-water solution down the sink.
Trust me, nobody wants their morning roast tasting like salad dressing. To fix this, fill the reservoir with fresh, clean water and run a full brew cycle immediately to start flushing the system.
- After the first rinse cycle, discard the water.
- Fill the reservoir with fresh water.
- Run a second full rinse cycle. This is non-negotiable to completely remove any lingering vinegar taste or smell.
Beyond the Brew Cycle: Caring for the Removable Parts
Descaling the inside is half the battle. Now you need to deal with the parts you handle every day, which get just as grimy.
Tackling the Carafe and Filter Basket
Coffee oils coat the carafe and filter basket after every single use. Unfortunately, these lingering residues quickly turn rancid. You don’t want that funk ruining your morning cup.
The best way to clean coffee maker parts is surprisingly simple: hot, soapy water. Grab a soft sponge or cloth to gently scrub away any residue. Please avoid abrasive scrubbers that can scratch glass or plastic.
Rinse them thoroughly with hot water to remove all soap suds. This simple task is a core part of daily hygiene.
Banishing Stubborn Stains from the Carafe
Sometimes, hot water and soap aren’t enough for those baked-on brown stains inside the carafe. It happens to the best of us.
For these tough jobs, baking soda is your best friend. Make a thick paste with a little water and apply it to the stains. Let it sit for a few minutes before gently scrubbing.
The mild abrasive quality of baking soda lifts stains without scratching the glass. Just rinse thoroughly afterward to remove the grit.
The Final Wipe-Down and Reassembly
Don’t forget the outside of the machine. Use a damp cloth to wipe down the exterior, including the warming plate. It makes the whole kitchen look better.
Make this part of your regular cleaning routine for better results. Before reassembling, make sure all parts—the carafe, the filter basket, the reservoir lid—are completely dry. Leaving the reservoir lid open helps it air dry faster.
Putting away damp parts is basically an invitation for mold to take hold. Remember, a dry machine is a clean machine.
A Comparative Look at Cleaning Solutions
Natural Alternatives to Vinegar
If the sharp smell of vinegar bothers you, do not panic. You have other solid options sitting in your pantry. Each alternative carries its own specific strengths and weaknesses.
The most common alternative is lemon juice, which is also acidic and food-safe.
Another solid pick is citric acid, often sold as a powder. Baking soda is fantastic for scrubbing stains manually. But here is the catch. It is alkaline, so it won’t descale the machine’s internal pipes effectively.
Choosing the Right Tool for the Job
To make the choice clearer, here is a direct comparison of the main natural cleaning agents.
| Cleaner | Best For | Pros | Cons |
|---|---|---|---|
| White Vinegar | Heavy mineral buildup (descaling) | Very effective, cheap, readily available | Strong odor, requires thorough rinsing |
| Lemon Juice | Light descaling, odor-sensitive users | Pleasant smell, food-safe | Less potent than vinegar, can be stickier |
| Baking Soda | Scrubbing carafes and removing oil stains | Mildly abrasive, great for stains | Not acidic, does not descale internal parts |
A Word on Commercial Descalers
Of course, there are also specialized products sold specifically for cleaning coffee makers. They are formulated to target mineral deposits.
While they work efficiently, they cost more than cheap pantry staples like vinegar. If you grab a bottle, you must follow the package instructions strictly regarding dosage. Ignoring the ratio can damage the machine or leave a chemical taste.
Some machine manufacturers may even recommend a specific type of solution to clean coffee maker systems, so it’s always a good idea to check your user manual first.
Pro Tips and Common Mistakes to Avoid
You have the basics down. Now, let’s cover a few expert tips and common blunders that can make or break your coffee experience.
The Cardinal Sin of Filling Your Coffee Maker
Here’s a widespread habit that secretly sabotages your coffee’s flavor. Many people do it without a second thought. It’s convenient, but it’s a huge mistake.
- Never use the coffee pot to fill the water reservoir.
- The carafe, even when rinsed, retains trace amounts of coffee oils.
- Transferring these oils back into the reservoir contaminates the water and contributes to faster buildup inside the machine.
- Always use a separate, clean container for water.
This simple tip can make a big difference.
What That ‘Descale’ Light Is Really Telling You
Many modern machines have an indicator light that tells you when to clean. But it’s not as smart as you might think.
The light isn’t triggered by a sensor that detects mineral buildup. It’s simply a pre-programmed cycle counter.
For instance, it might turn on after every 90 brew cycles. It’s a helpful reminder, but don’t wait for it if you notice signs of buildup sooner.
A Brief History: Why Modern Machines Need This Care
It’s easy to take our countertop brewers for granted. But the automatic drip coffee maker is a relatively modern invention, appearing in its popular form only in 1972.
Before that, methods like percolating often boiled the coffee, leading to a bitter taste regardless of cleanliness.
The precision of modern machines is what makes them so susceptible to buildup, and why regular cleaning is the key to a perfect cup.
Ultimately, maintaining a pristine coffee maker transforms your morning ritual from mundane to magnificent. By adopting a regular cleaning schedule, we not only extend our machine’s longevity but also guarantee that every cup remains rich and flavorful. Treat your brewer with care, and it will reward you with the perfect pour.